在系列的前两篇文章中,介绍了ZooKeeper环境的搭建(包括单机版、伪集群和集群),对创建、删除、修改节点等场景用命令行的方式进行了测试,让大家对ZooKeeper环境搭建及常用命令行有初步的认识,也为搭建ZooKeeper的开发环境、生产环境起到了抛砖引玉的作用。也介绍了用Java来实现API的调用,包括节点的增、删、改、查。通过对这两篇的学习,让大家对ZooKeeper的使用有了初步认识,也可用于实现系列后面篇章要介绍的命名服务、集群管理、分布式锁、负载均衡、分布式队列等。
在前两篇中,强调了阅读英文文档的重要性,也带领大家解读了部分官方文档,想传达出的理念是ZooKeeper没有想象中的那么难,阅读官方文档也没那么难。后面的篇章中,结合官方文档,在实战演练和解读源码的基础上加深理解。
上联:说你行你就行不行也行
下联:说不行就不行行也不行
横批:不服不行阅读源码就跟这个对联一模一样,就看你选上联,还是下联了!
这一篇开始源码环境的搭建,here we go!
很多老铁留言说很想研读些github上的开源项目,但代码clone下来后总出现这样或那样奇奇怪怪的问题,很影响学习的积极性。学习ZooKeeper的源码尤其如此,很多人clone代码后,报各种错,提示少各种包。问了下度娘ZooKeeper源码环境,搜出来的文章真的差强人意,有些文章错的竟然非常离谱。这里我重新搭建了一遍,也会介绍遇到的一些坑。
很多老铁上来一堆猛操作,从github上下载了ZooKeeper源码后,按常规方式导入IDEA,最后发现少各种包。起初我也是这样弄的,以为ZooKeeper是用Maven来构建的,仔细去了解了下ZooKeeper的版本历史,其实是用的Ant。如今一般用的Maven或Gradle,很少见到Ant的项目了,这里不对Ant多做介绍。
1 Ant环境搭建
Ant官网地址:https://ant.apache.org/bindownload.cgi
下载解压后,跟配置jdk一样配置几个环境变量:
1 | //修改为自己本地安装的目录 |
配置好后,测试下Ant是否安装成功。ant -version,得到如下信息则代表安装成功:
1 | Apache Ant(TM) version 1.10.7 compiled on September 1 2019 |
Ant的安装跟JDK的安装和配置非常相似,这里不做过多介绍。
2 下载ZooKeeper源码
源码地址:https://github.com/apache/zookeeper
猿人谷在写本篇文章时,releases列表里的最新版本为release-3.5.6,我们以此版本来进行源码环境的搭建。
3 编译ZooKeeper源码
切换到源码所在目录,运行ant eclipse将项目编译并转成eclipse的项目结构。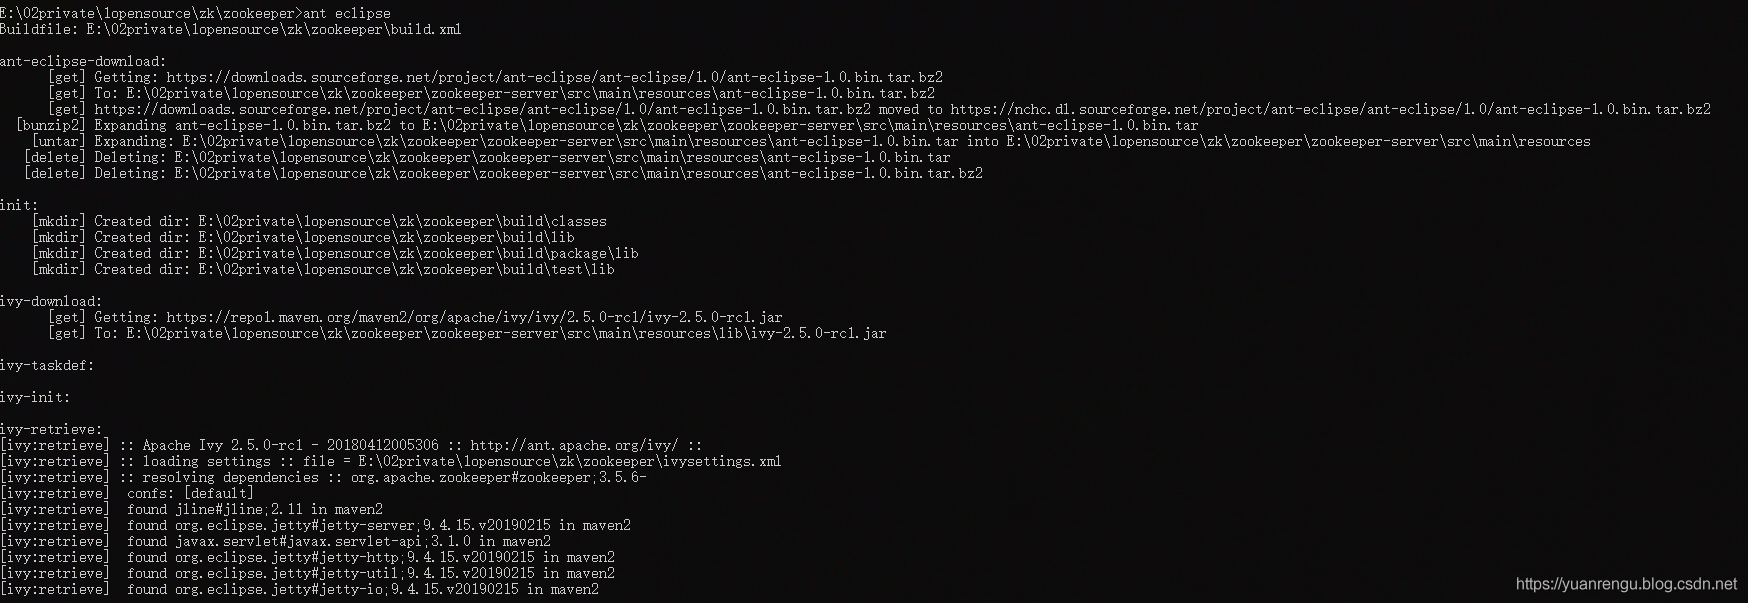
这个编译过程会比较长,差不多等了7分钟。如果编译成功,会出现如下结果: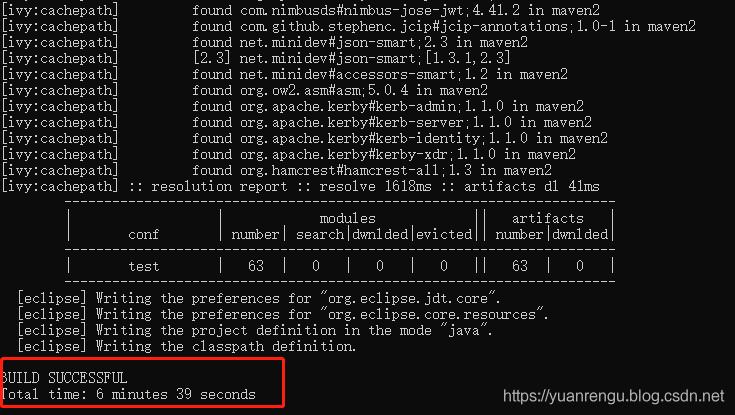
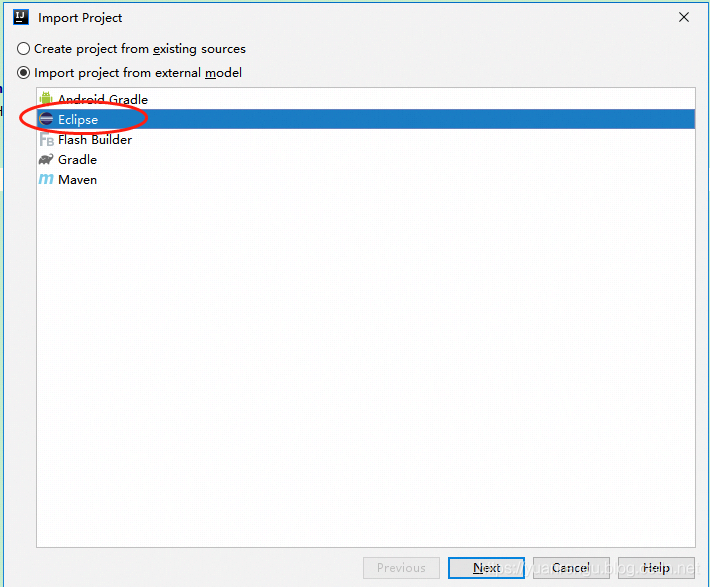
4 导入IDEA
上面已经将项目编译并转成eclipse的项目结构,按eclipse的形式导入项目。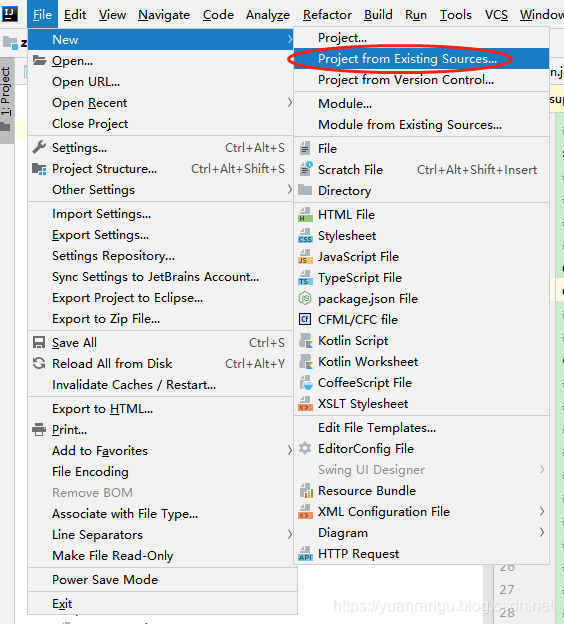
5 特别说明
将源码导入IDEA后在org.apache.zookeeper.Version中发现很多红色警告,很明显少了org.apache.zookeeper.version.Info类。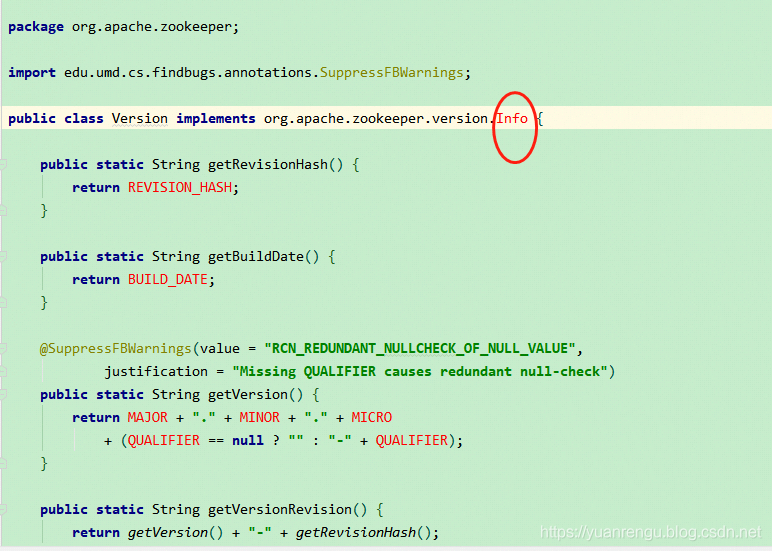
查询源码得知是用来发布的时候生成版本用的,我们只是研读源码,又不发布版本所以直接写死就ok了。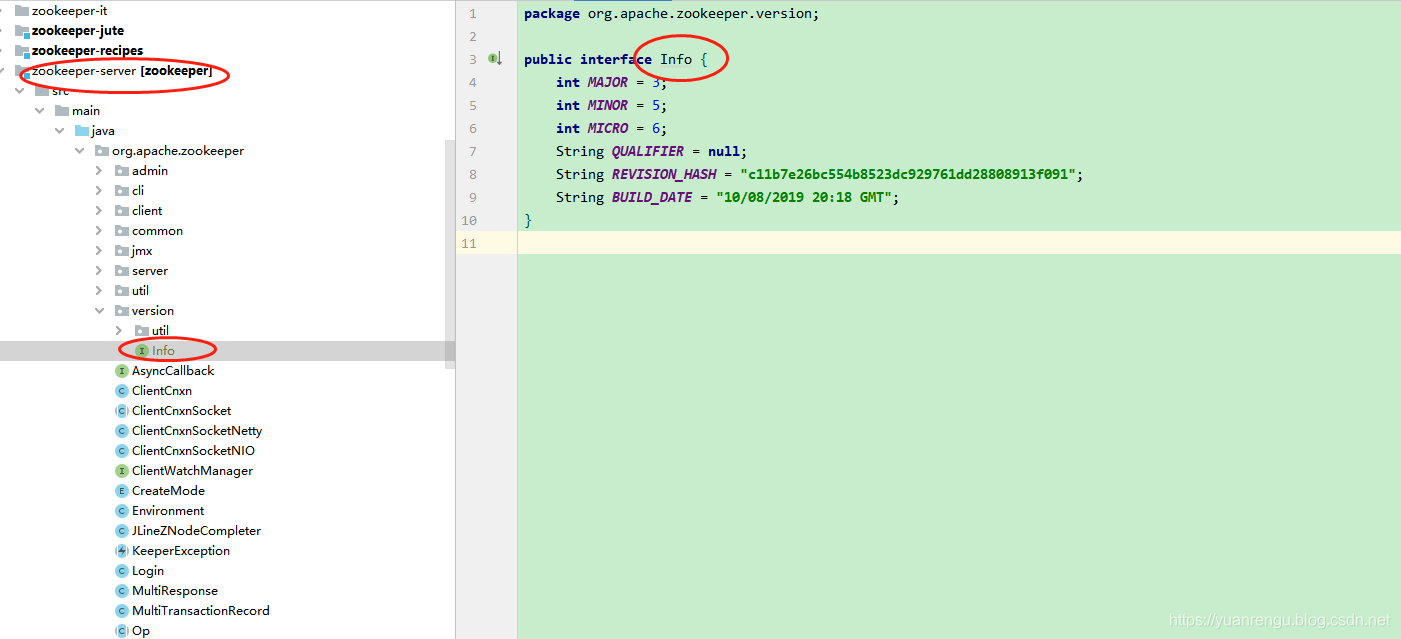
即新增Info类:
1 | package org.apache.zookeeper.version; |
6 启动zookeeper
针对单机版本和集群版本,分别对应两个启动类:
- 单机:ZooKeeperServerMain
- 集群:QuorumPeerMain
这里我们只做单机版的测试。
在conf目录里有个zoo_sample.cfg,复制一份重命名为zoo.cfg。
zoo.cfg里的内容做点修改(也可以不做修改),方便日志查询。dataDir和dataLogDir根据自己的情况设定。
1 | dataDir=E:\\02private\\1opensource\\zk\\zookeeper\\dataDir |
运行主类 org.apache.zookeeper.server.ZooKeeperServerMain,将zoo.cfg的完整路径配置在Program arguments。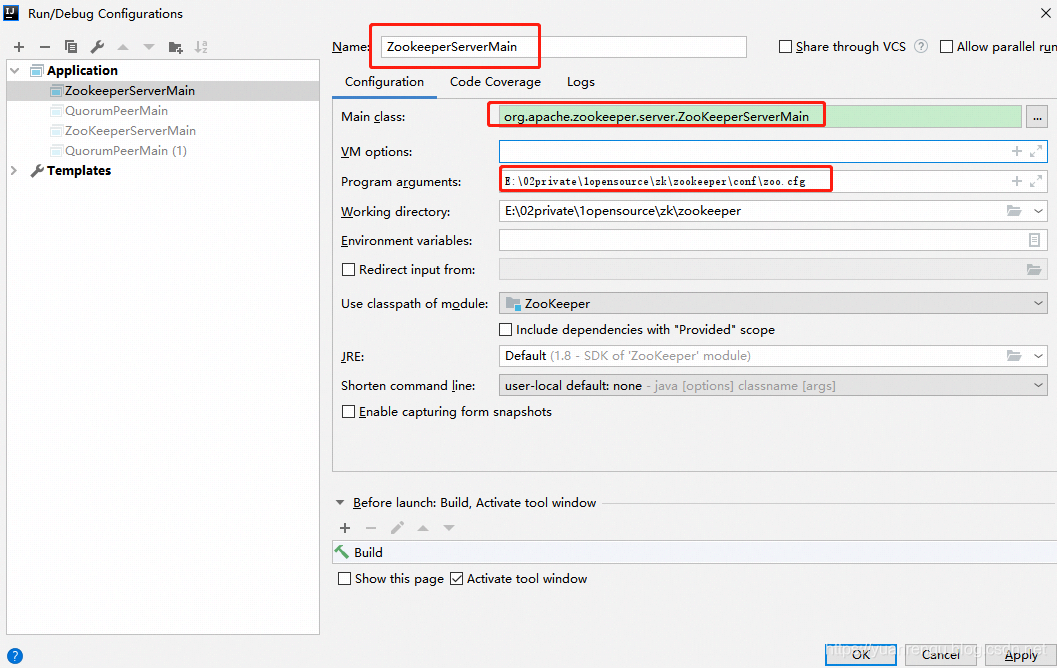
运行ZooKeeperServerMain,得到的结果如下:
1 | Connected to the target VM, address: '127.0.0.1:0', transport: 'socket' |
告知日志无法输出,日志文件配置有误。这里需要指定日志文件log4j.properties。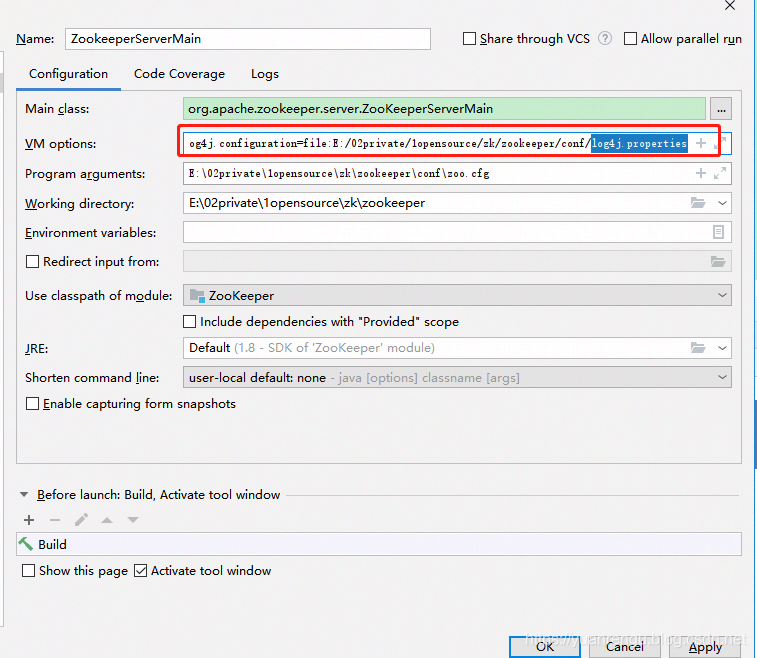
在VM options配置,即指定到conf目录下的log4j.properties:
1 | -Dlog4j.configuration=file:E:/02private/1opensource/zk/zookeeper/conf/log4j.properties |
配置后重新运行ZooKeeperServerMain,输出日志如下,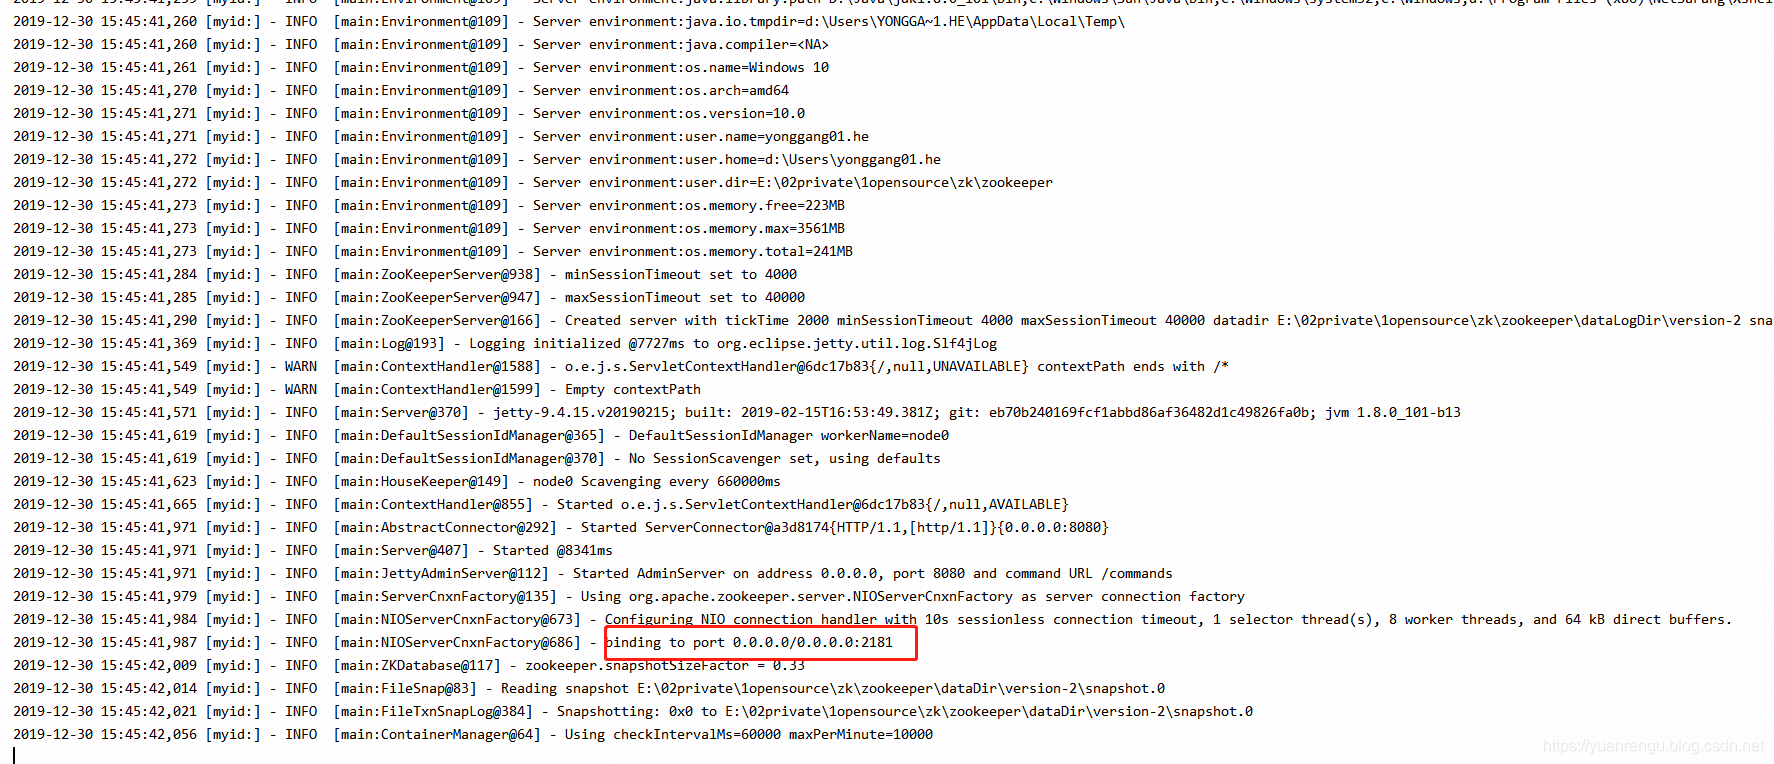
可以得知单机版启动成功,单机版服务端地址为127.0.0.1:2181。
7 启动客户端
通过运行ZooKeeperServerMain得到的日志,可以得知ZooKeeper服务端已经启动,服务的地址为127.0.0.1:2181。启动客户端来进行连接测试。
客户端的启动类为org.apache.zookeeper.ZooKeeperMain,进行如下配置: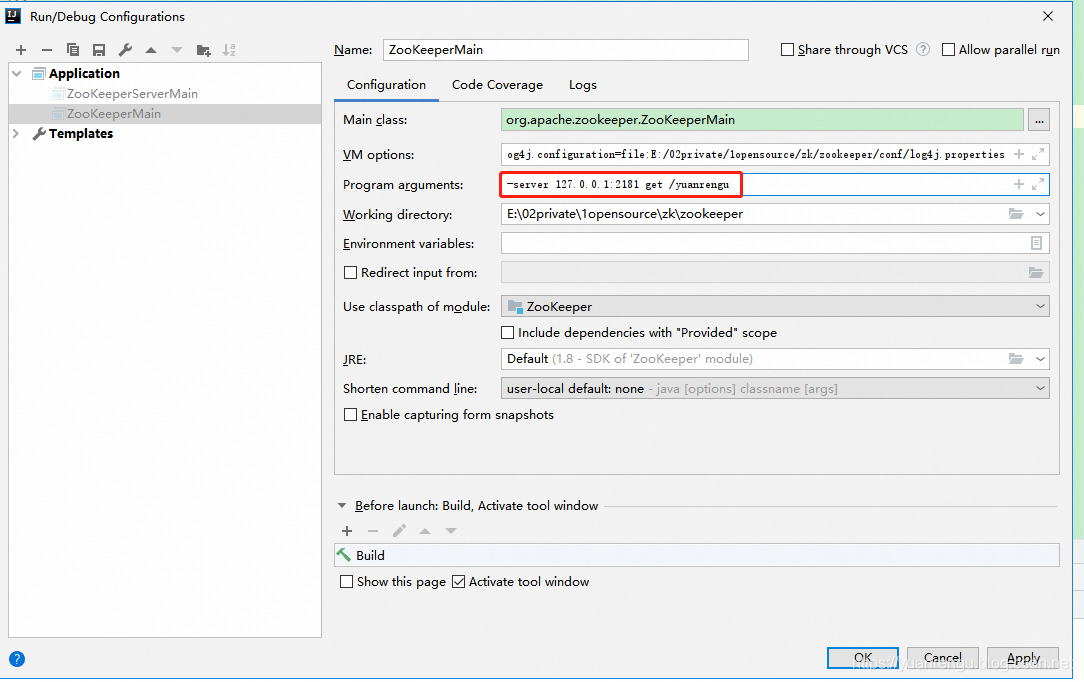
即客户端连接127.0.0.1:2181,获取节点/yuanrengu的信息。
下面带领大家一起看看客户端启动的源码(org.apache.zookeeper.ZooKeeperMain)。这里要给大家说下我阅读源码的习惯,很多老铁以为阅读源码就是顺着代码看,这样也没啥不对,只是很多开源项目代码量惊人,这么个干看法,容易注意力分散也容易看花眼。我一般是基于某个功能点,从入口开始debug跑一遍,弄清这个功能的“代码线”,就像跑马圈块地儿一样,弄清楚功能有关的代码,了解参数传递的过程,这样看代码时就更有针对性,也能排除很多干扰代码。
7.1 main
main里就两行代码,通过debug得知args里包含的信息就是上面我们配置在Program arguments里的信息:
7.1.1 ZooKeeperMain
1 | public ZooKeeperMain(String args[]) throws IOException, InterruptedException { |
通过下图可以看出,解析参数后,就尝试连接127.0.0.1:2181,即ZooKeeper服务端。cl.getOption(“server”)得到的就是127.0.0.1:2181。
7.1.2 parseOptions
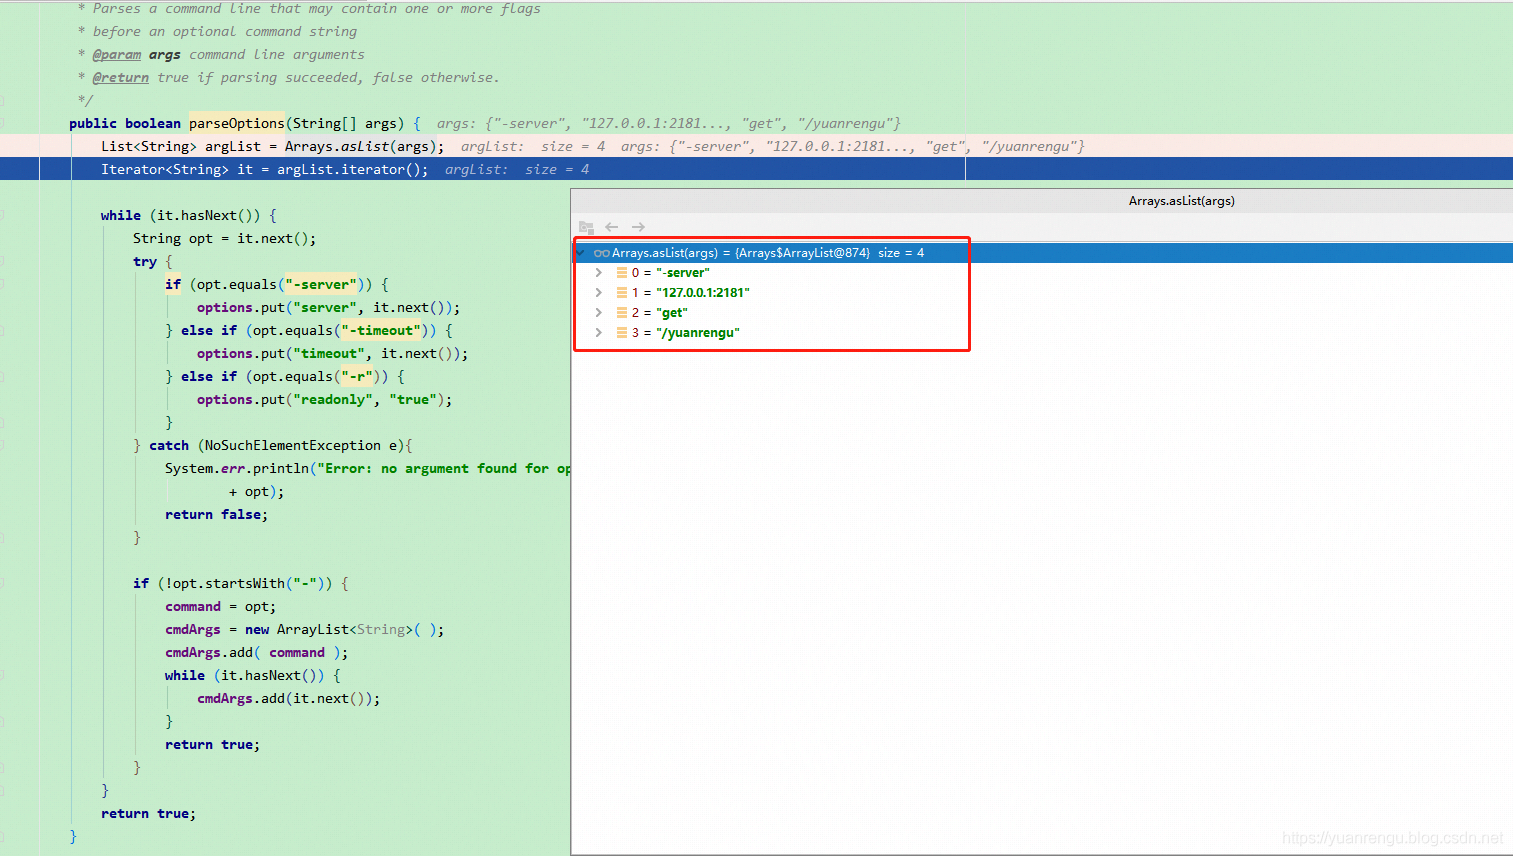
可以很清楚的得知解析args的过程,主要从”-server”,”-timeout”,”-r”,”-“这几个维度来进行解析。
7.1.3 connectToZK
1 | protected void connectToZK(String newHost) throws InterruptedException, IOException { |
ZKClientConfig.SECURE_CLIENT已经被标注为deprecation了:
1 | /** |
debug查看关键点处的信息,可以得知这是建立一个ZooKeeper连接的过程(【ZooKeeper系列】2.用Java实现ZooKeeper API的调用,这篇文章里详细介绍过ZooKeeper建立连接的过程)
下图看看几处关键信息:
Integer.parseInt(cl.getOption(“timeout”))为30000。
至此完成了ZooKeeperMain main = new ZooKeeperMain(args);的整个过程。简短点说就是:
- 解析Program arguments里的参数
- 连接ZooKeeper服务端
7.2 main.run()
敲黑板,重头戏来了哦!
一起来看下run()的代码:
1 | void run() throws CliException, IOException, InterruptedException { |
通过下图可以看出processCmd(cl);里cl包含的信息: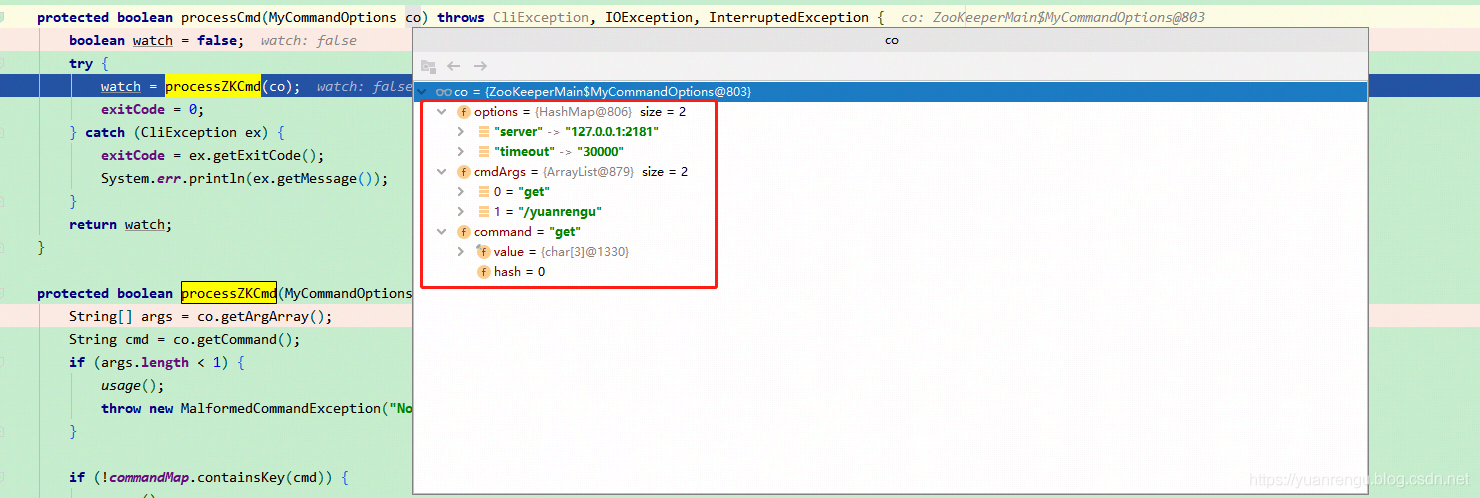
debug到processCmd(MyCommandOptions co) 就到了决战时刻。里面的processZKCmd(MyCommandOptions co)就是核心了,代码太长,只说下processZKCmd里的重点代码,获取节点/yuanrengu的信息:
因为我之前没有创建过/yuanrengu节点,会抛异常org.apache.zookeeper.KeeperException$NoNodeException: KeeperErrorCode = NoNode for /yuanrengu , 如下图所示: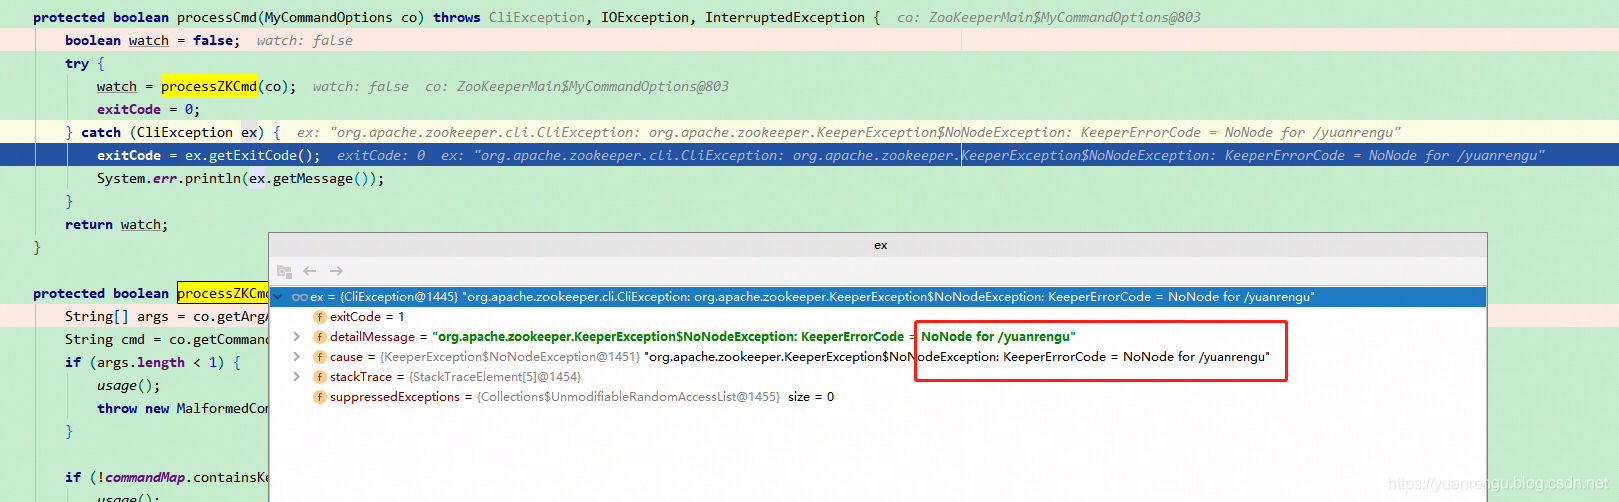
经过上面的步骤后exitCode为1,执行System.exit(exitCode);退出。
至此带领大家dubug了一遍org.apache.zookeeper.ZooKeeperMain,上面我说过,阅读源码干看效果很小,只有debug才能有助于梳理流程和思路,也能清楚参数传递的过程发生了什么变化。
温馨提示
上面我们介绍了源码环境的搭建过程,运行运行主类 org.apache.zookeeper.server.ZooKeeperServerMain 启动ZooKeeper服务端,运行org.apache.zookeeper.ZooKeeperMain连接服务端。
阅读源码最好能动起来(debug)读,这样代码才是活的,干看的话代码如死水一样,容易让人索然无味!
每个人操作的方式不一样,有可能遇到的问题也不一样,搭建过程中遇到什么问题,大家可以在评论区留言。